Monday, October 31, 2011

In The Not Too Distant Future...


The crew of the Satellite of Love (and it's puppeteer).
Since high school, I have been obsessed with MST3K.  For Halloween, I decided to finally buckle down and build my own Tom Servo, to go along with my Crow T. Robot costume.  I also harangued my husband and a friend into portraying Mike Nelson and Dr. Clayton Forrester, respectively.

Push the button, Frank.
Little did I realize what a massive undertaking this would be, mainly because the parts are hard to come by nowadays.  Instead of dropping a cool bill and a half on a Tom Servo kit like this one, I spent weeks stalking eBay in search of obscure "lamps" (flashlights) that apparently only exist in Australia.

The pieces - that's a barrel of monkeys barrel, a CD spinner, plastic bowl, PVC pipe, and a cut up Mr. McFarty or whoever he was.  The slinky arms and plastic tubing were really what I was after.
After sourcing the materials, I followed this online tutorial in assembling a working replica.  Yes, the head moves, the mouth opens and the arms flail about as if independent from his robot body.

Becoming Servo.
I ended up ordering the head piece and the vacuum-formed shoulders and skirt decorations online, since they proved to be the most difficult to obtain.  The shoulders were from the same headlamp that makes up Gypsy's eye, and which, again, can only be found online in hardware stores in Sydney or Melbourne.  Luckily, the kind man I found online who sourced out Servo parts had molds and forms for all of the pieces.  The black decorations on the skirt were molds from a train-set no longer in production, and cost I think $6 for all 6 (he threw in some extras since I bought a bunch).  The head piece came fully assembled - I just needed to match the paint for the body, which I found at a local hobby store.

My messy garage.  You can't work without Dr. Pepper.  See Tom's head chilling up on the shelf?
Rare pic of me working. I think I was using rubber cement in my closed garage here, hence the mask.
Getting there - sans hands, hoverskirt and decorative pieces.
Aside from the custom pieces and the head setup, the rest was fairly easy to come by. I had a few plastic bowls on hand, which was great cause I totally botched the first one. The plastic hands and slinky arms came from the pants-dropping doll (eBay purchase), the torso a barrel of monkeys (Parker appreciated playing with the monkeys), and the bowl skirt.  Some PVC insulation served as the skirt hem, and PVC pipe went through the body to turn the head which was mounted on the CD spinner.  The cord for the mouth was threaded through with a washer, allowing control of the mouth.  I found a toy car engine randomly in Toys R Us for about $3.  Total cost came in around $60, including custom ordered pieces.
Love the seamless paint match! Testors FTW!
Servo was a HUGE hit out on the town.  I brought him to work, but no one knew who he was.  Philistines.

Mike, Servo and Amy Winehouse in the background.

Servo does not appreciate being licked, Steve Jobs.

Majestic. As. F*ck.

Servo gets the ladies...

An assortment of characters opting for a pic with the Misties.

Wednesday, March 23, 2011

A challenger appears!

Every once in a while, an opportunity presents itself when I'm between projects.  I wasn't looking for anything in particular, but this little beauty stuck out on the drive home.
Oh, hai.

This poor dresser was discarded on the side of the road in anticipation of trash day.  Although it was missing the bottom three drawers, an idea came to mind that wouldn't require them.  I called the husband and we hauled it on home.

This dingy, dirty, drawerless dresser had seen better days cosmetically, but had decent bones and a ton of personality in the decorative trim and scrolled front.

Real dressers have curves!

She's got legs... she knows how to reuse them.

Ooh, what have we here?
I was relieved to find I could unscrew the handles in order to paint the remaining drawer, and even more pleased to discover a beautiful patina finish underneath the gooped-on paint.  Who covers up this kind of hardware??

Bad pic, but these are a pretty greenish patina!

After a thorough cleaning and a few coats of an off-white spray paint, I had a new entertainment unit for the basement!  The missing drawers left room for electronics, and the fiber-board backing was easy to drill through for cords and such.

Small, medium and large.

That's how you celebrate a completed project - with a LOtR marathon.

Saturday, March 19, 2011

Dining In The Deep End


CHANDELIER

Recently, we moved into a lovely new(er) home, embarking on a weekend moving endeavor like no other. (My friend Jen can attest to this - at one point the television said something and I went to go answer the door - I was delirious). After weeks of relocating, unpacking and cleaning, I was faced with a new dilemma... most of my old stuff didn't "go" with my new house. What's a girl to do???

Fortunately, there's websites like Design Sponge and Apartment Therapy, and super creative people like Jen to help me envision new ways of using my old furniture & decor.

I wish I had a before picture, but alas, none exist- my chandelier was completely black. Black bars, black chain, black shades, etc. Looked very chic next to the stark whiteness of my old, 1942 cottage home, but in our newer, brighter, warmer colored dining room, I needed something that would mesh with the cream colored walls and honey oak trim.

Voila! New shades (actually picked out by my husband) for $2 per shade at Stein Mart, and some spray paint ($3) was all it took, plus a cord/chain hiding scrunch ($10- Stein Mart). Again, $15 makes it look like an entirely new piece.


Can you imagine this thing completely black? Ugly chain exposed, no life at all (hey, it was $10 at a Sticks N Stuff store closing, I snatched it!)


CHAIRS

Since obtaining the new dining room table, and inheriting two chairs with it, I felt the need to recover them as well. The table was $75, but technically, the chairs were free.

Here's the Before...

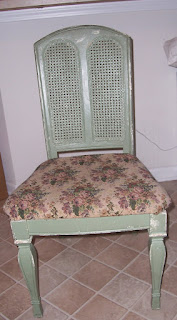
Not terrible, but very worn & dark.
After a few coast of spray paint ($6 for 2 cans) and fabric I found on a HUGE roll at the City Rescue Mission thrift store (a 60K square foot mecca of thrift and materials - its probably my new favorite, and it's NEVER busy), the chairs were saved!

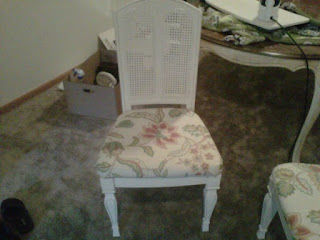
Brighter, happier, healthier...
...more productive, fitter....
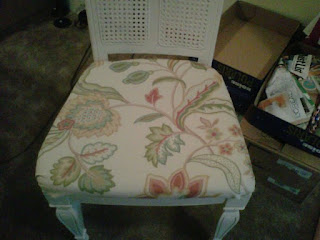
FANCY.

And fancy meeting YOU here...

I love the cane back on these chairs, and am in the process of searching desperately for a set of 4 to coordinate (not match precisely). The fabric was a lucky find, and I have enough to cover the other chairs & possibly make a table runner/place settings. Love thrift stores!


Thursday, March 3, 2011

Odds and Ends and Stuff and Things

Transforming common, ugly Goodwill & Salvation Army rejects is an absolute high, and I'm not just talking about paint fumes.  There's nothing quite as satisfying as transforming kitschy knick-knacky krap into functional and sleek modern items.

These vases I picked up in Goodwill for $2 & $3 each.

Like Jem, they are truly outrageous.

This chair was $3.99.
And has seen better days.

A little spray primer later... ($3)


And finally, spray paint ($3). The green was a small sample jar that Lowes mixed for $3.

A Clockwork chair in a Fincher-esque world.


Still working on obtaining the perfect color fabric for the cushion - ideally something white & green with a dark navy blue. But not bad for about $15 so far!

Boo-Kays

Since the insanity of my wedding has subsided, I'm finally able to update and post more projects. Some projects don't even end up in use - like the original bouquet I made for my November hodge-podge outdoor wedding. I believe I got this idea from Pinterest, but stuck to more subdued creams, golds, silvers and pinks instead of the brightly contrasting colors they chose for the all jewelry bouquet.

I started with very basic supplies - a round floral-holder cut in half served as the base on which I pinned fabric flowers, buttons and other shinys:

Button button who's got the button?
Winding tulle for flowers & held in place with a jeweled pin.
All the pretty fabric flowers.
En route to completion.

There are amazing things you can do with a toilet paper roll (the holder).
Finished bouquet. Yes I can spell bouquet.
I'm actually kinda sad I didn't get to use this bouquet - but in the end, it just didn't work with my fall colors.

Wednesday, February 23, 2011

Accidentally on Purpose

Sometimes projects are so simple, I question whether I should even post them.  This was one of my favorites, however, and I'm super pleased with the results, so here you go.

This floor screen frame was an unintentional acquisition from my ex-pack rat boyfriend.  I shudder a bit every time I remember the brief time we spent together, in which my office resembled an episode of Hoarders (because I wouldn't let him take over the rest of the house with his "salvaged" junk).

Anywho, this Oriental frame lacked fabric, was too short and too wide, and had been cheaply painted with dim gold flecks and fans on the bottom slats.  I guess those pokey tetanus-riddled hooks on top were once intended as a coat rack substitute:

But since I don't own a Chinese restaurant...
I saw its potential, however, and decided to make something I actually needed - a headboard.

First I ripped off the hooks and the bottom veneered panels. By disassembling the frame, reassembling it into a single pane and giving it a matte coat of dark brown paint (spray paint to the rescue, about $6), this Wang Chung throwaway became a chic modern headboard.  I mounted it to the wall directly behind our king-size bed, where it fit perfectly.

See?  It's pretty much my favorite.  Sweeney likes it too.
Excuse the messy bedroom - I think we had just moved in and I had nothing else set up.  Ugh, that brown carpet - gotta love the building boom of the 1980s.